Tuesday, July 30, 2013

Phottix Ares Review

One of the first things I've learned when I started out with photography is that if I want to make great portraits I must get my speedlite off camera . It's a good thing the Canon 7D has a wireless speedlite controller so I was able to control my off-camera Canon 430 EX-II speedlites. However, this is limited by line-of-sight constraints: the speedlites and the built-in flash of the 7D must "see" each other or else the external speedlites won't fire.

Another way of controlling off-camera speedlites is with the use of radio triggers. Unfortunately, radio triggers can be very expensive (or so I thought). If you're just starting out, then the price alone of the triggers can be a great deterrent in making great portraits.


Enter the Phottix Ares, a no-nonsense radio trigger. The standard package comes with one transmitter and one receiver. There is an assortment of connectors that will enable you to fire strobes. There is also a wrist strap for those times when you want to hang the receiver. The transmitter-receiver combo comes with a pouch, though the pouch is missing if you buy the receiver only. There is a pair of AA-batteries for each unit - this makes replacing depleted batteries very easy; no more looking for button cell batteries that you cannot buy from your nearest convenience store.


Build quality of the system is very good and may withstand some knocks and low-altitude drops.

Using the Phottix Ares is very easy. Just mount the transmitter on your DSLR, mount your speedlite on the receiver and just make sure that the transmitter and receiver are on the same channel. (One of the thing that caused me great headaches when I considered the other brands is that their receivers do not have a built-in hot shoe - you need to buy another piece of accessory if you want to use a 430EX-II.) There are 8 channels to choose from though there are no zones. This can somewhat limit your photography, but what beginner needs 4000 zones with 36 million channels? And instead of zones, you can just set your different speedlites to different channels and just tell the transmitter to fire all of the receivers when you need to. It is that easy!


The Phottix Ares is Manual Flash mode only - there is no TTL. So, you will need to learn how to control the power of your speedlite, not to mention how to set the Aperture setting and Shutter speed of your camera. Also, the sync speed maxes out at 1/250 of a second so, no high speed sync is available. And no, don't think you are missing out on these functions with the more popular brands - their cheapest units also do not have these functions at four times the price!


Phottix says that the Ares has a range of up to 700 feet. I still have to put that to the test. But what I have already tested is that the system does not need to see each other - no line-of-sight needed! This is great if you are going to put your speedlites inside modifiers, another thing that beginning photographers need to learn how to use, among other things.


The only thing I don't like is that the foot of the receiver is made of plastic. I think it would make more sense if the foot is metal since it will be carrying the weight of the speedlite - it should be made of more sturdy materials. However, the receiver can be screwed to a tripod head, so, if you don't feel confident about the plastic foot, then you can definitely screw the receiver on a tripod. Oh, and another negative: the Ares does not work with the Canon Powershot G15...

I'll do a photo shoot using the Phottix Ares in the near future. Since it is summer time now, outdoor photography is not as inconvenient anymore (I need several hundred feet to test Phottix's claim, right?). I will feature the photos made in a future post. But for now, what I can say is that the Phottix Ares is a very good alternative to the more expensive radio triggers. Just imagine, for the price of one of the cheapest unit of the more popular brand, you can get the Ares transmitter and two receivers! Just imagine what else you can do with the money you can save and still get very decent photos!


So get yours here:


------------
Gear used to make this post:

-- Canon Powershot G15 (Reviews Part 1 and Part 2)

Thursday, July 25, 2013

The Lowepro Transit Sling 250AW Review

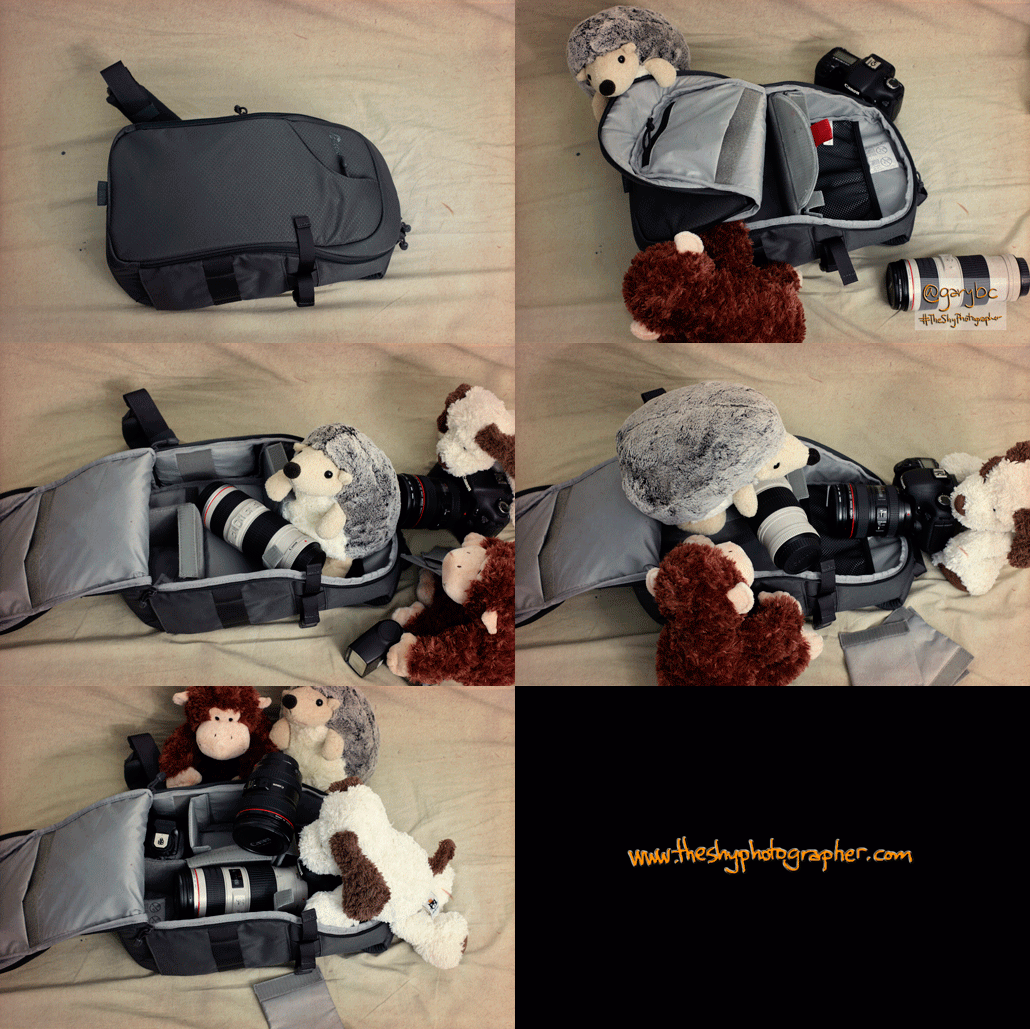
There is a new sexy bag in town... And it is called the Lowepro Transit Sling 250AW.


Now, the beautiful thing about this bag is its high-configurability. Whether you are using a compact system, a DSLR with a standard zoom, even a DSLR with a 70-200 telephoto, your camera will be able to fit in! It all just depends on the way you configure the dividers. And since the front of the bag can be fully opened, configuring the inserts is a breeze.


To see how easy it is to configure the dividers, our "kids" helped out with the demo!

Lowepro Translit Sling 250AW photo transit-sling-4_zps6eec8b32.gif

The bag comes with an all-weather cover, though, while filming the video for this post, the wife and i got caught in a short rain shower and the bag kept my gear inside dry. I think it is safe to say that the bag will be able to withstand a short burst of rain...


The Lowepro Transit Sling 250AW is, I believe, an idea whose time has come. An old favorite bag of mine is the Lowepro Slingshot 202AW, which I reviewed here. In that review, I said that it would have been better if there is a dedicated slot for an iPad. And Lowepro delivered on that front. There is a slot for your iPad or any similar-sized, or smaller, tablet. Unfortunately, the 11-inch MacBook Air will not fit.


I think it is safe to say the the Transit Sling is the evolution of the Slingshot 202AW.

The bag performs admirably when the time comes to shoot pictures. The side door makes camera access very easy, though I had a little difficulty getting my Canon 5D Mark II out. The opening is a little tight. If you are using a Rebel camera, or a compact systems camera, then getting your camera out would be a breeze!

Note that if you will be using a telephoto, then you will have to get your camera from the top.


You can mount a small tripod on the side of the bag. And you can also add other slip-lock attachments on the strap and on the same side where you can put the tripod (as I demonstrated in the video). There is a stowable slim strap which you can use to stabilize the bag when you are on the move.


And of course, the slim profile of the camera bag will enable you to zip in-and-out of tight places, such as fairs, food fests, and the like. And the great thing about it is, despite the slim profile, the bag has a relatively high capacity!

Some things that could be improved upon? I still wish that the strap is heftier than it currently is. Since there is only one strap carrying the bag, a thicker strap would be greatly beneficial to the wearer. Also, I wish that there are buckles to prevent the front of the bag from opening all the way, like what is found on the Lowepro Video FastPack, which I reviewed here.


But overall, the bag is a great one. With the great construction, very good materials used, and the high customizability this bag is a can't miss!

The Lowepro Transit Sling 250AW is Highly Recommended!

Check out the video that the wife and I made for this review:


So get yours here:


PS. I included the Transit Backpack in the link, just in case you want a bigger-capacity bag.

PPS. Special thanks to Derrick Story and Yvonne Petro of Lowepro for providing the bag. Thank you for your continued support.

PPPS. Special thanks to the wife, @Reina_Reyes, for tirelessly serving as my videographer.

PPPPS. I have come a long way in video creation since that first video that I made with the FastPack, if I should say so myself. :)

------------
Gear used to make this post:

-- Canon Powershot G15 (Reviews Part 1 and Part 2)

Thursday, July 18, 2013

Waiting for the Train...


Made one beautiful afternoon at the golden hour at the Roosevelt Green and Orange Line.

------------
Gear used to make this post:

-- Canon Powershot G15 (Reviews Part 1 and Part 2)

Tuesday, July 16, 2013

The Manfrotto Pixi

Are you, just like myself, someone who cannot let go of his point-and-shoot camera but yet cannot live without his iPhone? Then, you are in for a treat.

You see, it is a good idea to always have a tripod with you. Why? Well, for one, stabilizing your camera is a must when the amount of light goes down. When the shutter speed goes longer than a quarter of a second, no amount of image stabilization from your camera can compensate for camera shake: only a tripod can help you there. And also, a tripod can greatly help a photographer if (s)he wants to include (her)himself in the picture. I should know, even if I love to take photos more than be in one, there are times when I want to include myself in the shot!


The Manfrotto Pixi is a great tripod to have for those times you want to have a tripod but still don't want to be burdened by bringing along a 5-pound behemoth.


The Pixi is great for your point-and-shoot cameras and camera phones. It can even accommodate compacts up to a weight of 2 pounds. All these conveniences for a tripod that is just half a pound in weight!

Just put it on a table, mount your camera of choice and that's it! You can include yourself in the photo and take long-exposure shots. You can collapse the legs together and the tripod will become a hand-holdable gadget when you want to take videos. Holding the Pixi makes it easier to shoot videos than holding the camera directly; the former is a more stable set up so camera shake is greatly reduced.


So, you now have no excuse to bring a sturdy tripod: At such a light weight and a manageable price, the Manfrotto Pixi is a must have.


@Reina_Reyes and I prepared a short video demonstrating the Pixi:


Special thanks go to Silvia Luison of Manfrotto for providing the Pixi.

The Manfrotto Pixi is Highly Recommended!

So get yours here:


PS. To mount the iPhone, I used a Joby GripTight which I reviewed here.

------------
Gear used to make this post:

-- Canon Powershot G15 (Reviews Part 1 and Part 2)

Thursday, July 11, 2013

Joby UltraFit Sling Review

I don't like camera neck straps. They strain the neck, it's uncomfortable when it's hot, and they give away the type of camera you are using.

So, I always use an alternative to the neck strap. And now, I would like to introduce you to one of the best straps out there: the Joby UltraFit Sling Strap.


The strap is a well-made strap that, I feel, can stand a beating. The strap is thick so that ensures comfortable wearing for extended periods. And most importantly, you put the strap on either (yes, either!) shoulder so your neck won't carry the weight of your gear. (The thick part of the strap is made up of the same material as the Highly Recommended Joby 3-Way camera which I reviewed here).


But, for me, the best feature of the strap is the ability to easily adjust its length. Just imagine some of the famous messenger bags: you shorten the strap when you move around so that the bag will be closer to your body and thus more secure, right? The same principle applies to the Joby UltraFit; just pull the O-ring and the camera apart and the strap will shorten. And more importantly, when you're ready to start shooting, just pull the camera to the normal shooting position and the strap will automatically extend! How's that for easy shooting?!?


Lastly, when you are going to move around for an extended period, then just lock the strap in the shortened position.


The only negative that I can say about this strap? Well, you attach the strap directly into the tripod mount; so, if you will be using it for a different camera, then you will have to unscrew it from the current camera and screw it on to the other - there is no quick-release feature to transfer the strap from one camera to another. Well, the strap is so good then you might as well get one for each of your cameras!!! Oh, also, there is a version specifically for women.


The Joby UltraFit Sling Strap is Highly Recommended!

I prepared a short video on how to use the strap:

Joby UltraFit Sling Strap from Gary Coronado on Vimeo.


Thanks to the wife, @Reina_Reyes, for serving as my videographer and photographer. And special thanks to Emily Voigtlander and Jen Goykhman of Joby for providing the strap.

So get yours here:


-----------
Ps. (The wife noticed that this is the second post that I opened with the same statement, the first one being here; yes, I hate neck straps that much!)

-----------
Gear used to make this post:

Tuesday, July 9, 2013

The BlackRapid Wrist Strap

I don't like neck straps. So, I need to find a suitable replacement.

A worthy replacement is the BlackRapid RS-Sport-2, which I reviewed here.

But when I want to simplify things, I reach for the BlackRapid Wrist Strap. It's a simple, well-made, no-nonsense wrist strap. It simply is composed of a durable strap, the plastic slider and the ConnectR found on all BlackRapid's straps.


How do you use it? It's as simple as attaching and securing the ConnectR to the separately sold FastenR. That's it. If you want the strap to be more secure, just move the adjustment slider towards your wrist.


So, if you want a very simple solution to your neck strap dilemma, then consider the BlackRapid Wrist Strap.

It is Highly Recommended!

So get yours, and the BlackRapid FastenR, here:

------------
Gear used to make this post:

-- Canon Powershot G15 (Reviews Part 1 and Part 2)

Tuesday, July 2, 2013

The Canon Powershot G15 Works Great for Fashion Photography!

Want to go into Fashion Photography?

Well, you don't need to spend a great amount of money on the top-of-the-line DSLR to start you off, or to just give it a try. The Canon Powershot G15 is more than capable to accommodate your needs!


Check out my photos of the Fashion in the Street Chicago as proof that you can do a runway shoot with a G15. I fixed my focal length at 35mm (equivalent), my aperture setting varies from f/1.8-f/2.8, ISO is at Auto with maximum setting of ISO1600, and I change my exposure compensation from +1/3 to -1/3.


So, if you just want to try out fashion photography, go to a free event and use the Canon Powershot G15. You'll be able to save a lot and yet you will still be able to take great photos!


So get yours, plus additional accessories, here:


Labels

Photography Chicago There's Always A Shot Review Philippines Gadgets Outdoor Photography Accesories Metro Manila Street Photography Events Photography Inspiration Photo Journalism Summer Photography Advice Travel Winter Accessories Photography How-to Portraiture The Wife Apple Autumn Shot A Million Times iPhone Video Review Product Review Holidays Long Exposure Spring Architecture Princeton iPhone Accessories Inspiration Taguig Art Indoor Music iPod Canon Cameras Event Fireworks Photography Technique Photojournalism How-to Museum Product Photography Books Fine Art Fitness Health Personal iPhone photography Flowers Fujifilm Panorama iPhone Photo Blue Hour #MoreFunInThePhilippines Food Photography Landscapes Lenses Filipino Fujinon Launch Mac Shoes Sony California HDR Japan Makati City Musings Navy Pier Night Photography Photoshop Science iPad Android BGC Bags Blog Contest Family Fashion Fitbit Friends Internet Motion Blur Non-iPhone phone Road Trip Running Sunset USA iPad Accessories iPhone Apps Animated GIF Apple Accessories Battery Bluetooth Cebu Cycling Dance Earphones Food Garmin GoPro Gym Home Luzon Macro Natural Light Photography Outdoor Run Pageantry Parade Quantified Self Quezon City Smartphone Sports Tabletop Photography Time Lapse Video Videography Workout iOS 4K Advice Anime Animé App Review Apple Watch Architectures Asia Athletics Beach City Scape Cosplay Dining Drop-proof case Duathlon Editorial Emotion Flower Globe GoProMax HD Halloween Holy Sites Home Theater Hyperlapse Joby Laptop Accessories Learning Long Zoom Love Lowepro MacBook Manga Manila Milky Way Mind Museum Minnesota Mobile Phone Mobile Phone Photography Movies North Luzon Orange PSHS Pasay City People Photography Event Post-Processing Power Rain Requests SM MoA Samsung Satire Sound Speakers TPLEX Tagaytay Tanay Televisions Temples There is always a shot Walking Workshop iPhone Case iPhone Xs Max

Comment Guidelines

Keep all comments relevant to the original post. Do not post comments which contain profanity, hate speeches or solicitations of any kind. Posting comments to this blog constitutes your agreement to adhere to these guidelines.